Submitted by sam on Fri, 02/03/2006 - 21:05.
Like the Promyvions, the CoP area Phomiuna Aqueducts has a lot more to offer than just a Boss battle and Mission-related events. You can farm for mysterious JSE (Job Specific Equipment) quest item Subligars. You can hunt a number of interesting NMs for useful and unique drops. And you can farm for expensive and quest related items.
But there's so much to do here, where do you begin? I hope to answer this question in this guide. Read on for more...
What are the Phomiuna Aqueducts?
The Phomiuna Aqueducts are an area that becomes available after completion of CoP 2-2, "The Lost City". The Aqueducts are located in the Tavnazian Archipelago region, underneath the Tavnazian Safehold. Their zone from the Safehold is at (I-6) on the bottom map, and they escape to Misareaux Coast (K-7).
Sand O'rians will recognize that the Aqueducts resemble Bostaunieux Oubliette in terms of basic textures and models. However they differ from Bostaunieux in a number of key architectural areas such as ladders seperating different levels and the very high ceilings in many sections.
The Phomiuna Aqueducts Map
The Aqueducts map is obtained by finding a ??? in one of a number of Libraries found inside the Aqueducts. This quest is only mentioned in passing in this document as there is really very little to it (other than waiting).
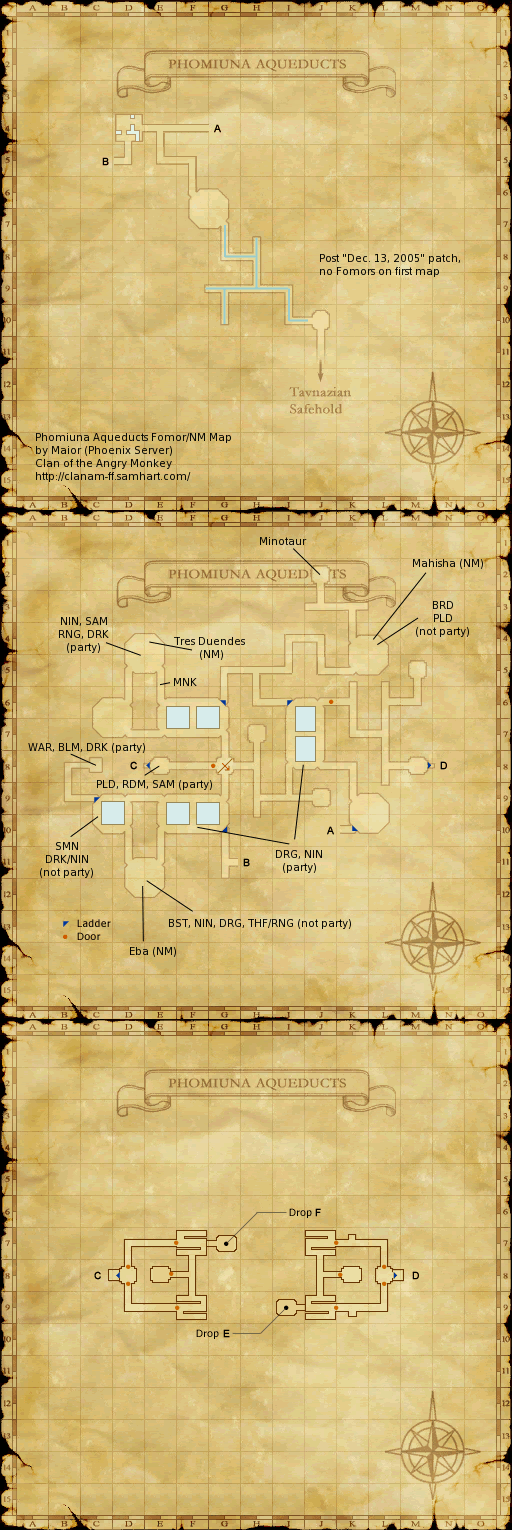
However, the map used in this document which includes markup for Fomor parties as well as NMs found in the Aqueducts can be found online here:
This map is always in flux and may be incomplete. If you would like to contribute information to this map, it is available on a Subversion repository in original Gimp XCF source here.
Mob types found in the Aqueducts
There are several different types of mobs inside of the Aqueducts. Some are aggro mobs, some are not. We will not look at the different types of mobs and try to identify what items you need to safely traverse the Aqueducts whether it be for Mission or something else.
Aggro Mobs
The most important mobs to worry about are the aggro mobs.
- Fomors : One of the more common mobs you will find in the Aqueducts are undead soldiers known as "Fomors". Fomors are the fallen Tavnazian fighters from the Great War who's souls have been cursed to forever roam the Tavnazian Archipelago. They are undead and will aggro low-life as well as sound. Thus, you will want Sneak to avoid them generally.
There is, however, a trick with the Fomor. The Fomor's aggro is determined by something known as "Fomor Hate". We talk about Fomor Hate later.
- Taurs : The Taur family of mobs are strange dragon-like creatures that have true sight, e.g., you cannot use Invisible to avoid them. Your only hope to avoid them is to pass them while their back is turned to you. The most common Taurs you will encounter are Stegotaurs which drop a number of quest items, however the CoP 2-3 boss is a Taur called "Minotaur".
The Taurs all share a special skill called "Doomed" which can spell quick death to anyone who is unlucky enough to get hit with it. We talk about Doomed later.
- Slimes : There are several different members of the slime family roaming the Aqueducts and they all aggro sound. Thus, sneak is vital to avoid them.
- Doomed : Not to be confused with the special Taurs move "Doomed", these are the various large creatures found in very specific places. Most of the time, you can avoid them, but if you have to pass them, use Sneak and Invisible.
Non-Aggro Mobs
The remainder of the mobs found in the Aqueducts are non-aggro. Usually it is best to just avoid these.
- Diremites : Diremites are spider-like creatures that roam the Aqueducts. They are non-aggro, but are terribly powerful if provoked. You can easily avoid these by just not using any AoE attacks or spells when they are near.
- Bats : Bats are found everywhere here as well. They will not aggro you unless you have low-life and heal near them.
- Pugs : There are several kinds of Pugs found in the Aqueducts, and none of them aggro. Once again, you avoid them by simply not using any AoE attacks or spells near them.
Special Concerns
Now, there are two "gotchas" you always need to keep in mind while inside the Aqueducts (and even outside them). These two gotchas are things unique to the Aqueducts and you need to know of them and how to deal with them.
Fomor Hate
Fomors are an interesting bunch. As you kill them, you build more and more "Fomor Hate" against you. This hate determines how they aggro you. If you have effectively zero Fomor Hate, then you do not need sneak to walk past them (you still need to not have low HP, of course). If you have insanely high Fomor Hate, then their aggro radius will be huge and they may be able to detect you through sneak[1].
You can check your Fomor Hate by talking to Resauchamet (K-7) inside the Safehold. When you talk to him, he will say one of the following phrases. Each phrase indicates a different level of Fomor Hate. Level 1 is the lowest hate you can have:
- Level 1: You still have a fairly good head start, but they will not let up until they have found you and filled your heart with poison and pain.
- Level 2: They are close… It is only a matter of time before you have fallen within their reach.
- Level 3: Can you not feel the hands that reach up from the bottomless depths of hell? Can you not feel the gaze of a thousand eyes, glowing red with anger and hate?
- Level 4: The grip of evil is tightening on the very essence of what makes you who you are. Be forewarned, as it will not be long before you are confronted with a battle for more than just your life.
To lower your Fomor hate you must kill Beastmen found in the Tavnazian Archipelago. This primarily includes Orcs and Gigas. The more you kill, the lower your hate will be.
Doomed
The Taurs in the Aqueducts have a specal move called Mortal Ray. Any character that is looking at the Taur while the Taur is facing them and uses this move may become "Doomed".
When you are Doomed, you have a countdown of 10 seconds. At the end of the countdown, if you are still Doomed, you will die. There will be no gradual HP loss as if you were poisoned, dia'd, etc. You will just drop where you are. Boom... You're dead.
In order to counteract Doomed, there are several things you can try:
- Spam Holy Waters : This seems to be the best way to fight it.
- Spam Cursna : Have people in your team spam cursna on you.
- Spam Erase : Hey, I've never seen it work, but why not? Couldn't hurt, you're dying anyway.
The best defense against Doomed, however, is a good offense. If you simply turn your character away from the Taur when you see "Mob readies Mortal Ray.." scroll by, you will always avoid Doomed. Thus, it is generally recommended to fight unlocked from the Taur so you can turn your character away at a moments notice.
Preparing for a Trip into the Aqueducts
From these few things, it becomes apparent that the best way to prepare for any event inside the Aqueducts is do have the following:
- Bring Sneak Oil : The only mobs that you can fool inside the Aqueducts are aggro to sneak (except for the Doomed, which you avoid anyway). So unless you can cast it on yourself, bring a couple of stacks of sneak oil at least.
- Bring Holy Water : Everyone should bring at least one stack of holy water to fight the Doomed status effect. If you are a tank or a melee who will be gathering a lot of hate during battle, I'd suggest bringining a minimum of two stacks of holy water.
- Lower your Fomor Hate : Run around the areas outside the Safehold killing Beastmen, and check your Fomor Hate often.[2]
The CoP 2-3 Mission
Now we get to the actual meat of the Aqueducts and the reason most people come here: The 2-3 Mission and Minotaur Battle.
The 2-3 Mission involves first going to the Minotaur, killing him. Then taking a trip up to the Library on Map 3. From there, you either have to leave the Aqueducts the way you came, or just warp out (recommended).
Minotaur
On map 1, you will zone in from (J-11). You must get to (J-2) on map 2 in order to fight the Minotaur.
The Minotaur has a special Draw-In move it will do when it first sees any member of your party. This move will draw in every member of your party or alliance to the Minotaur, regardless of where they are.
The ramifications of this are kind of neat. This means that you can technically have a single person (or even a small "scouting party") sneak up to the Minotaur while the rest of your group waits and rests at the entrance. Often it is easier for a single person or small group to navigate the aggro-ridden Aqueducts to the Minotaur rather than trying to drag a large group of people there. Of course, the downside to this approach is, if this single person or small group gets in trouble, they are on their own.
The Minotaur battle is basically just like a harder Taur battle. The Minotaur has Mortal Ray again, which means that Holy Water is critical to have. However, the Minotaur really isn't too difficult. A single party can take him out easily if they are balanced and know their jobs.
After the Minotaur dies, however, your team needs to move very quickly. The Minotaur will respawn in 5-10 minutes, which means that if any teammate is left in the Minotaur room (dead or alive) the entire party/alliance will be dragged in there again. Thus, any persons dead need to be raised quickly and everyone needs to sneak up and get back out to the hallways south of the Minotaur room.
Once the Minotaur is dead, and everyone is out, you are ready to proceed to the next part of the mission.
Library
After the Minotaur battle, your group needs to move to the door at (G-8).
At (G-8) there is a very small, teeny, tiny, miniscule ledge that drops down into the water. It is very, very, very important that you DO NOT DROP OFF THIS LEDGE!!!!! Even though this ledge looks small, you will not be able to get back up. If you fall, you will have to backtrack to the room south of the Minotaur and work your way back to the door. So... once again... DO NOT DROP OFF THE LEDGE AT (G-8)!!!
At (G-8) there is a door that is locked. This door can be opened with a key (that drops from Fomors in the area), or you can have a THF pick the lock. My personal preference is to drag a THF along, but since they aren't always the most abundant for this mission, you do have the option to farm for keys.
Beyond this door you will come to a ladder being guarded by 3 Fomors in a party (PLD, RDM, SAM). Ignore these Fomors (unless you have enough people to handle a 3 Fomor party) and proceed up the ladder behind them.
At the top of this ladder, take a left, carefully dealing with the Taurs in the hallway, then proceed around to the Library at (F-7) on map 3.
In this Library you will find a ??? among the books that, when clicked, will open the hallway connecting the two Libraries at (F-8). Inside this hallway you will find a puzzle involving a row of lanterns on the wall.
To solve this puzzle, you need two people. One should stand in front of the lantern corresponding to the current day, the other in front of the lantern corresponding to the element that your day's element is strong too. First, click the current day lantern, then the weaker element lantern. When you have done this, a door will open up. Everyone needing the Mission should run inside and examine a door for the final cutscene of 2-3.
Subligar Farming
The next thing that can be done in the Aqueducts is farming Subligars used in a Bastok quest. The quest is Brygid the Stylist Returns where you take special JSE Subligars o Brygid in Bastok and have them turned into JSE body armor. Often these JSE body armors are very nice.
The Subligars are dropped from the Fomors inside the Aqueducts. Each Fomor drops the JSE that is related to their jobs. For example, the MNK Fomor drops MNK Subligar. There are a few notable exceptions (SMN drops WHM/SMN Subligar and the BST drops BRD/BST Subligar) but for the most part this holds true.
When Subligar farming, you have to be careful of Fomors in parties. Typically, you want to only farm the Fomors not in parties (unless you have a lot of firepower). Looking at our map we can see that the following Fomors can be found running around solo:
- MNK
- SMN
- THF
- RNG
- DRK
- NIN
- DRG
- BST
- PLD
- BRD
This means that the subligars these Fomor drop are the easiest to find. However, it also means that if you have either of the following jobs, then getting your JSE subligar will be quite difficult:
NM Hunting
The final thing that you can do in the Aqueducts that I will talk about here is hunting specific Notorious Monsters. There are really three NMs that you might want to target:
- Tres Duendes
This is probably the most common NM to hunt down here as it drops three very useful items. Each item is Rare/EX, and cannot be sold.
- Vampiric Claws - Excellent H2H slashing weapon with HP drain and hidden effect against slime
- Chiroptera Dagger - Excellent Dagger that gives comperable stats to the Hawker +1
- Niokiyotsuna - Katana that boosts the job-trait Double Attack
Tres Duendes is a NM bat that has a BLM Fomor pet. You will fight them both at the same time. I personally have never seen Sleep stick on either of these mobs[3]. The key is to kill the BLM Fomor first as he is generally weaker but has nasty AoE BLM spells.
Once the BLM is down, Tres Duendes becomes much meaner. You can expect a long and drawn out battle as his evasion boost and accuracy down moves will reduce most attacks to whiffs. Erase is very important here to get rid of accuracy and attack down effects, but usually the WHM is busy keeping the tank alive and the bat will just spam it on all members anyway.
A well balanced party of 6 can take the bats down, but it is hard. I'd personally recommend a minimum of 8 people (with two tanks and two dedicated healers) to make the fight more comfortable.
- Eba
Eba is a Fomor DRK NM. He drops a Fomor Tunic which is useful for a number of different jobs. His attacks are slow but powerful, NIN tanks are recommended when fighting him. As are a minimum of two dedicated healers.
Ultimately because the Fomor Tunic is not the most useful item in the world (lowers HP and boosts STR and DEX for a lot of jobs that don't need these boosts except for MNK which could be using Jujistu Gi at this level anyway) Eba is not normally hunted. Add to this his 24 hour respawn time and you can see why he is often ignored.
- Mahisha
Mahisha is a Taurs NM that spawns just south of the Minotaur. He drops the "Sinister Mask" which is a great headpiece for DRK and a few other jobs.
Mahisha is just like the other Taurs in that he is True Sight, Aggro, and has Mortal Ray. He also spawns in a room with a Fomor PLD and Fomor BRD. I recommend strongly that the PLD and BRD are cleared before battling Mahisha.
Mahisha is not a terribly difficult battle and can be killed by a reasonably strong party of 6. That being said, I'd suggest having at least 8 players with two dedicated healers to be safe.
[1] : Many people have debated whether this is true. All I can do is tell you
my experience. I have had now two occassions where I've seen Fomors aggro full HP people through sneak. Once was with a stranger who had been on a Fomor sub run every day the week before our Aqueducts run and had never reduced hate (he aggroed the MNK/SMN party that used to be on map one). The other time was when I was personally aggroed by every Fomor in one Library during a sub-run/Minotaur fight. I had sneak up and was full HP, but had not lowered my hate before the Minotaur fight.
Now, one theory here is that the Fomor's ability to hear through sneak (have True Sound aggro) is only active if enough people in your party have very high Fomor Hate. E.g., if you have very high Fomor Hate but everyone else in your party/alliance does not, then you wont ever see the True Sound aggro.
[2] : Actually, if your goal is to get the Fomor Codex, then you want your hate at level 4 at least. So, depending on what your goals are, you may not want to lower your Fomor Hate at all.
[3] : We have tried numerious combinations of BLM and BRD, and nothing has worked on these mobs. I am resonably confident that neither can be slept.


![[ Home ]](http://ffxi.clanam.org/themes/clanam/images/home-off.png)
![[ Archives ]](http://ffxi.clanam.org/themes/clanam/images/archives-off.png)
![[ Blogs ]](http://ffxi.clanam.org/themes/clanam/images/blogs-off.png)
![[ Guides ]](http://ffxi.clanam.org/themes/clanam/images/guides-off.png)
![[ Forums ]](http://ffxi.clanam.org/themes/clanam/images/forums-off.png)
![[ Image Galleries ]](http://ffxi.clanam.org/themes/clanam/images/image-off.png)
![[ Older Polls ]](http://ffxi.clanam.org/themes/clanam/images/polls-off.png)
![[ Advanced Search ]](http://ffxi.clanam.org/themes/clanam/images/barsearch-off.png)
![[ My Account ]](http://ffxi.clanam.org/themes/clanam/images/my_account-off.png)


For the Lamps & Map
Order of Days
Firesday > Earthsday > Watersday > Windsday > Iceday > Lightningday > Lightsday > Darksday > Firesday
Fire is strong against Ice
Ice is strong against Wind
Wind is strong against Earth
Earth is strong against Lightning
Lightning is strong against Water
Water is strong against Fire.
Iceday would be
Ice lamp/torch then immediately the Wind lamp/torch
Lightsday would be
Light lamp/torch then immediately the Dark lamp/torch
Once inside of the secret passageway all folks wanting to finish the Minotaur mission need (as stated) to move forward until they get yet another cutscene with your friend and mine, Nag'molada
Lamps should be assigned to the aqueducts guide/pathfinder (probably Maior) and the host/hostess (whomever). Everyone else needs to patiently wait.
For MAP FARMING, I did not come up with the following description of Farming for Maps (and it should be obvious the coordinates are for Map 3):
http://ffxi.allakhazam.com/db/areas.html?farea=150
o There are four storerooms, J-7, J-9, F-7, F-9, wherein four types of ??? appear.
o One type of ??? are to open secret doors in the storeroom you're currently in: there are two each for two secret doors on the shelves in each storeroom in J-9 and F-7.
o The second type of ??? is a hint to the elemental correlation between the torches and how to open the path to the ornate gates through the secret hall, this ??? only appears in the southwest corner of the J-9 room.
o The third type of ??? is a random hopping spawn on a ten minute timer. There are 4 total places it can pop, with two pops on the shelves (one in each corner) of the J-7 and F-9 storerooms. These move in a set pattern, alternating corners in the two storerooms every 20 minutes, if the ??? is up in J-7, it will not be in F-9, and vice-versa. When ten minutes from the last pop have elapsed, the ??? will depop and move to one of the corners of the other storeroom. After another 10 minutes passes, the ??? will move again to the corner it was *not* last in, back in the original storeroom. Every 40 minutes the ??? will make a full rotation back to its original position, having completed its pattern. The message when hitting one of these ???s is "There is nothing out of the ordinary here." Their purpose is as yet unknown.
o The fourth ??? gives the key item Map of the Aqueducts when clicked. It can be located in any of the four storerooms, in one of the corners but not on the shelves. After it has been clicked, the ??? depops and repops after a certain amount of time (30 minutes?) in another corner of one of the four storerooms, possibly in the same storeroom it was obtained in.
o Please note some of this information is simply educated guesswork and hearsay, corrections are welcome.
o Thus, a party of six could get all 6 of their maps in a couple of hours, if they had their keys farmed (one key for each person, to be safe) or a THF along to open the gates, since the two sections of the third map are reached through different locked gates.
Solo'd my Map
Sorta solo'd! LOL! After Kitchel opened the iron gate at G-8 on Map 2 the Alliance proceeded to finish our Minotaur Mission.
I stayed behind after everyone left and verified the above descriptions of ??? as being highly accurate. The Map to Phomiuna Aqueducts was not present in either of the F-7 nor the F-9 storerooms. So as WHM I left and came back.
If you are WHM with a Key, and have reraise, stoneskin, and blink (and know where to die) if you posses the knowledge the map is not present in two of the storerooms you can run past Stegotaurs and try for the other two storerooms. I used my Key on the gate at J-6 on map two and proceeded forward. I died right outside of the door to room J-9 on map 3. This J-9 storeroom will allow you to get to storeroom J-7. So I activated my reraise once the Stegotaurs moved away and waited to heal from Reraise Sickness (did not want to meet any Fomor with low-life).
I found my map in the NW corner of the J-9 storeroom. I did not have to check the storeroom at J-7 though I did verify that if you are in J-9 you can get to the secret passageway which will lead you to J-7.
The dropdown (Drop E) does indeed plop you down next to a Foul Meat at J-9 on map two. I had Invisible and Sneak up so he did not bother me. This knowledge is handy for anyone who does not want to fight Stegotaurs outside of the Storerooms.
I could have teleported out but I wanted to enjoy running around a bit with my new map (finally have it!)
=^_^=
So for those of you seeking a map the ??? for the map apparently lands in a corner of one of the four storerooms on map 3 (the rooms with shelves and cabinets and LOTS of Fomor) and the ??? does not move until someone selects it; at which point the map ??? is freed again to seek out any of the four storerooms where it will settle down once again.
I suppose a THF/NIN without a key, but with a reraise earring and warp scroll, could also solo their map. Would require low Fomor hate and a stack of sneak oils. Start with J-9, wait 30 mins, check J-9 again and if not there in J-9 check out J-7; warp out if necessary. Come back and check out F-7 and if not there check out F-9. If you could not get your map some other party was in the Aqueducts map farming.
dropdowns at G-7 and I-9
on Map Three these E and F drops are holes within secret rooms behind secret doors activated by yet another ???. Rumored to have Foul Meat at the bottom you will require Sneak and Invisible before you drop down.
Supposedly yet another way to escape the Libraries. Said to be a long haul back to the Aqueducts' Exit. Both E and F seem like they might correspond with H-7 and J-9 on Map Two.